Overview and Objective
In this lesson, students will explore given Haberdasher's Puzzle - a dissection type puzzle. In this puzzle, an equilateral triangle is cut into four pieces that can be reassembled to make a square. Students will measure the sides and angles of a given example to determine how to cut any equilateral triangle so that the pieces can transform into a square.
Warm-Up
Share this canvas with the students and ask them to use the pieces of the triangle to form a square.

Allow students to share their work after assembling the squares. You may also want to talk about the history of the puzzle. The main problem is finding a way to cut an equilateral triangle into four pieces that can be rearranged to make a square. It is named the Haberdasher's puzzle because the four shapes are like cloth pieces you might find in a haberdashery (a shop selling cloth pieces for sewing).
In 1903, Henry Ernest Dudeney (1857 –1930), an English author and mathematician, solved Haberdasher's Puzzle by cutting the triangle into four pieces exactly like the ones used in the warm-up. The problem and Dudeney's solution is especially interesting because it can be built from hinged pieces which can be folded and unfolded to form both shapes

Main Activity
Begin the main part of the activity with each student having both the equilateral triangle and the square on their canvas.

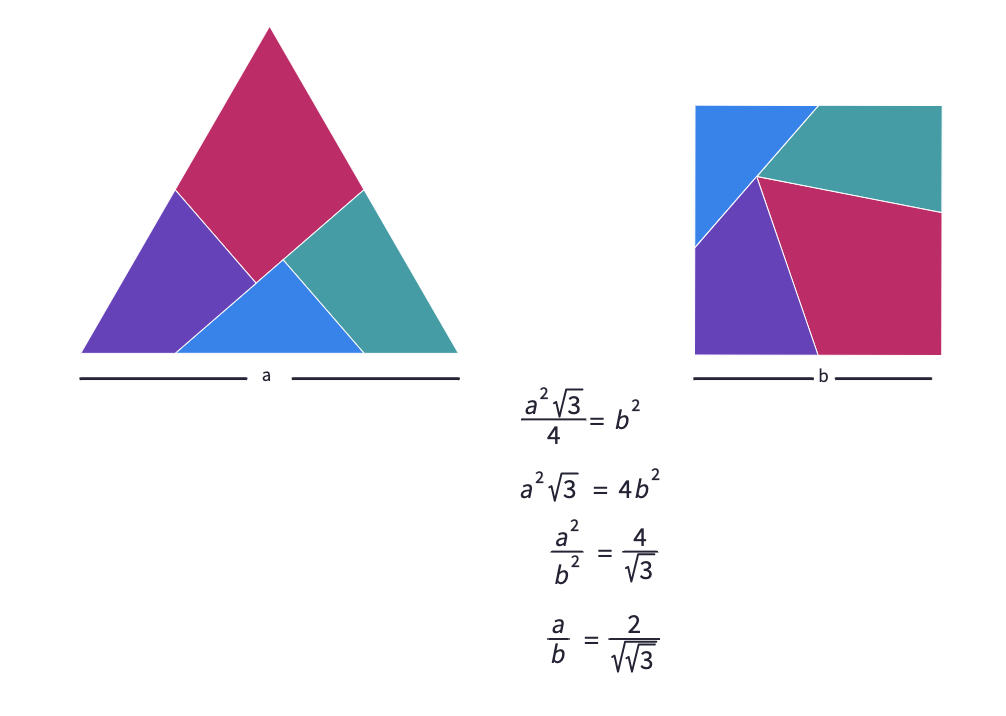
Ask students if the side lengths of the equilateral triangle and the square are the same. If needed, they can use the ruler tool to answer the question. Then ask about the perimeters and the areas of the two shapes?
Students can use the bottom center toolbar to see the perimeter and the area measures once they outline the shapes using the segment tool.
In fact, any polygon can be formed from another one by cutting it into a finite number of pieces and rearranging those by rotations and translations if and only if they have the same area (This is the Wallace-Bolyai-Gerwien theorem). The question is how to make those cuts.
Let's examine Dudeney's solution closely to be able to cut any equilateral triangle so that the pieces can be assembled into a square.
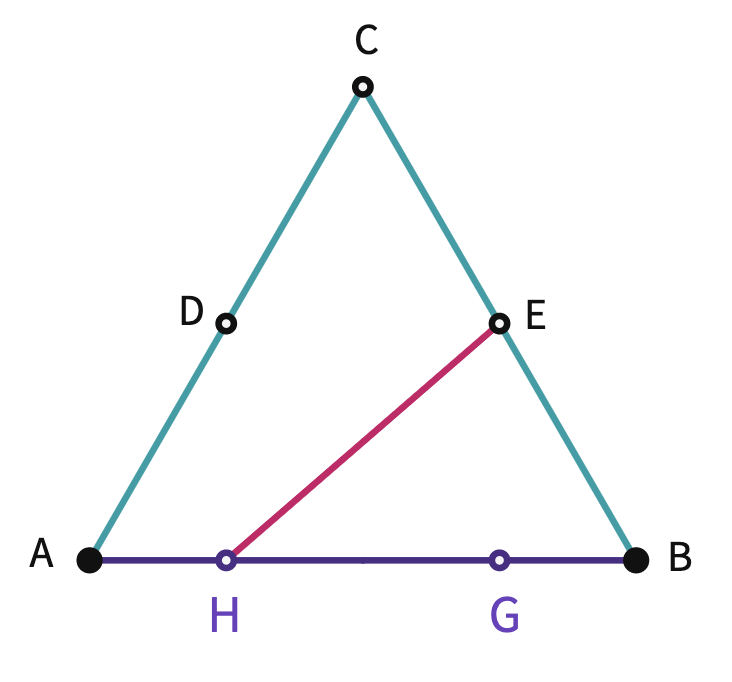
First, label the vertices and points of intersections of the equilateral triangle. Encourage students to explore the side and angle measures of the triangle.
Let them measure the lengths of AH, HG, GB, AD, DC, EC, and EB. Ask students their findings. After that, measure the angles at D, E, H, G, M, N.
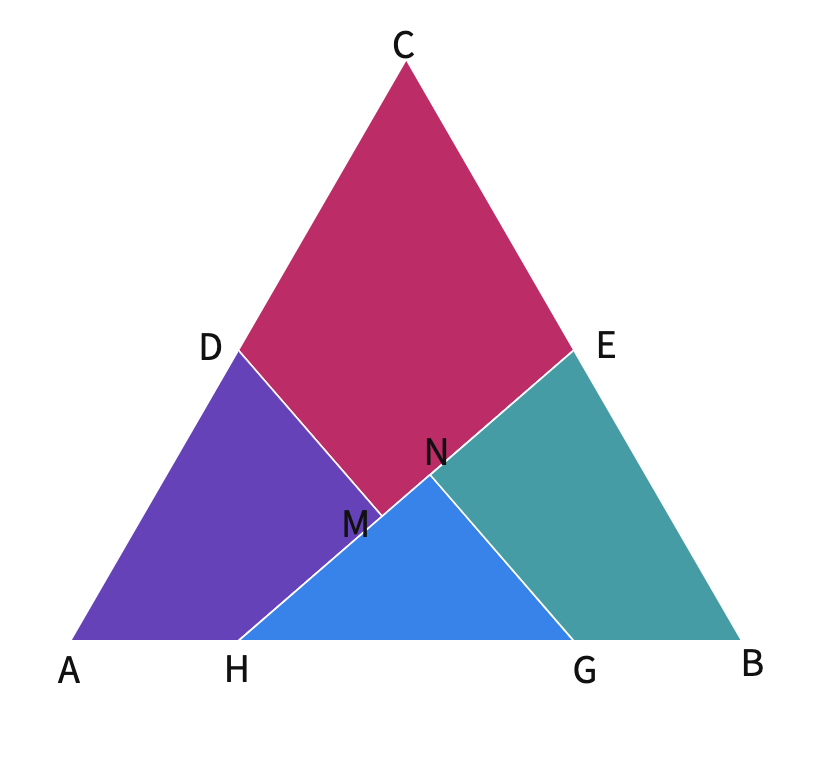
Students will realize that D and E are the midpoints of the sides AC and BC, respectively. Next, ask about the locations of points H and G.
The lengths of AH, and GB segments are of the length of AB.
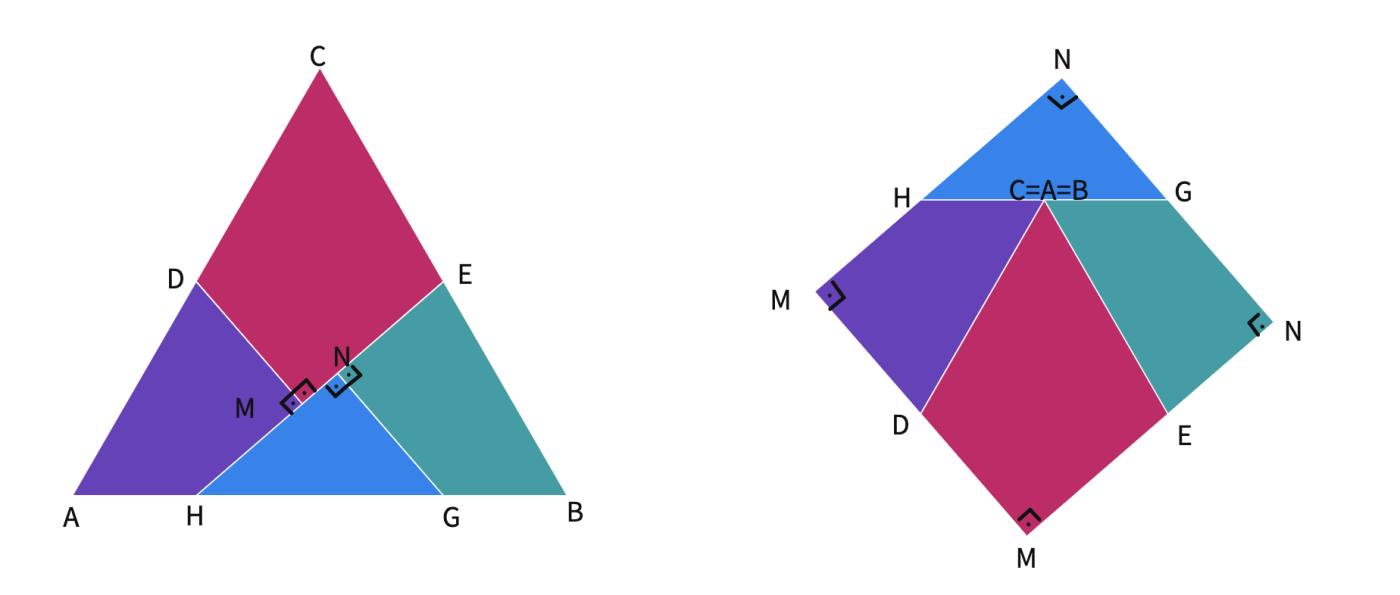
Also, the angles at N, and M are 90 degrees. Therefore DM and GN are perpendicular to HE. Some students may benefit from inserting the point labels and angles on the square to see the corresponding sides and angles.
Discuss as a class how these measurements can help them to construct the pieces.
First, ask students to construct an equilateral triangle of side length of 5 cm. Then, invite students to share the approaches they used to create the triangle.
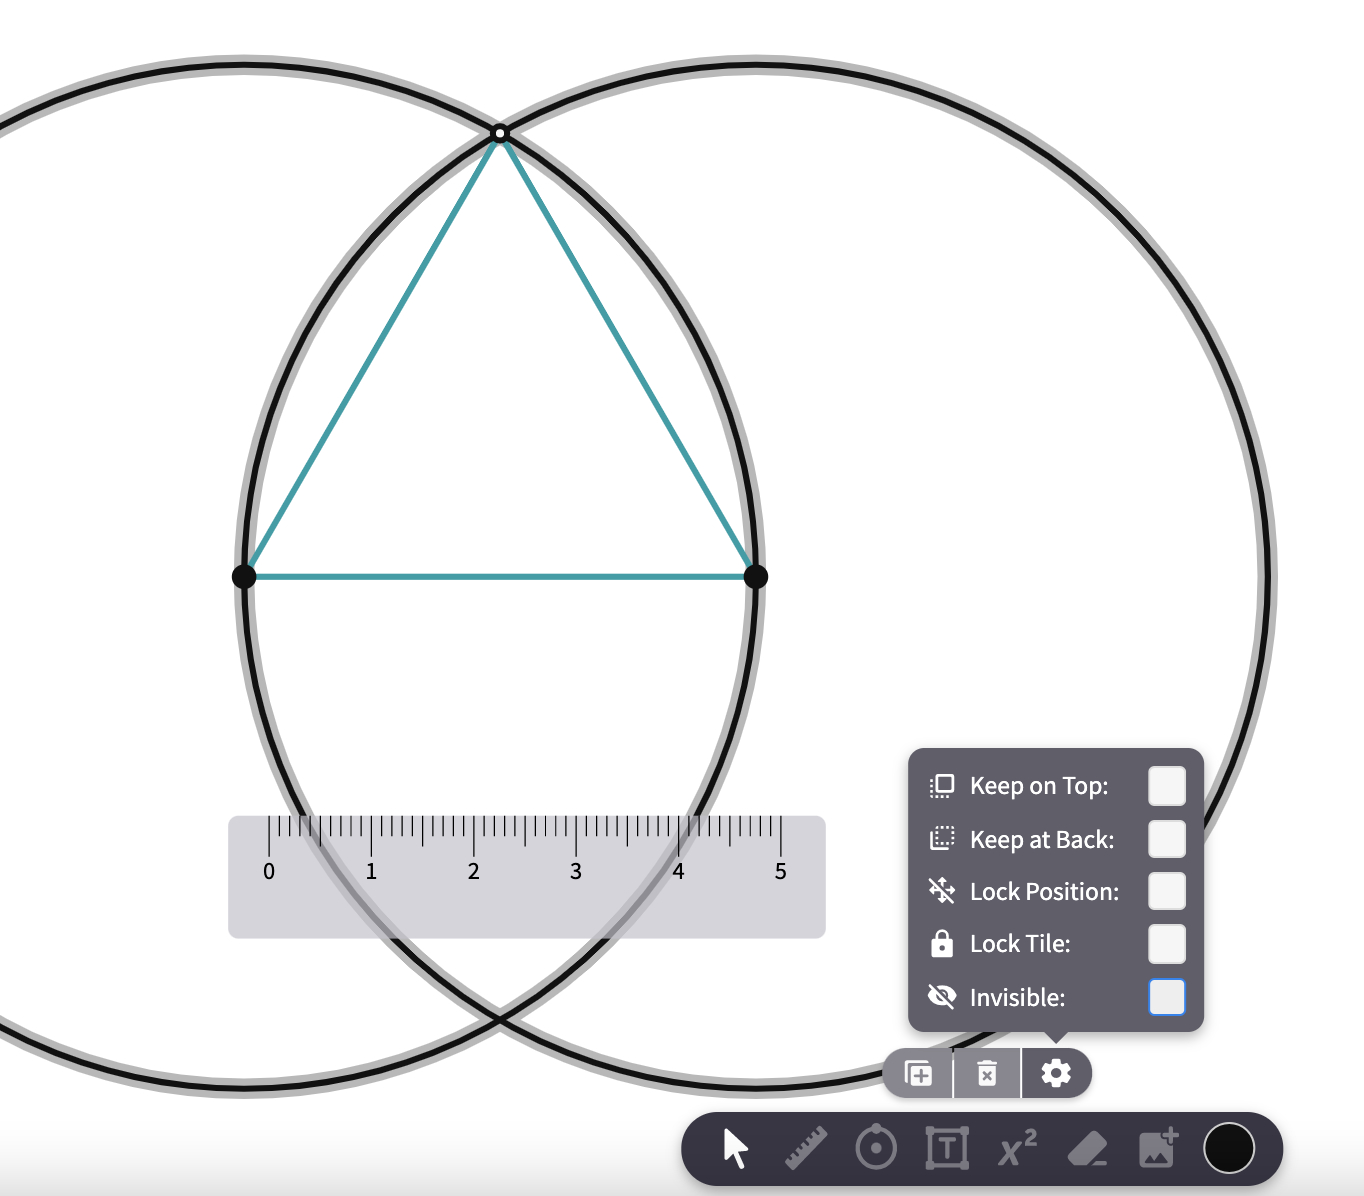
One strategy can be using intersecting circles with 5 cm radii.
- Draw a circle with center A, and radius, |AB|, as 5 cm. Next, draw another circle with center B, and radius, |BA|, as 5 cm. Construct one of the intersection points to create the equilateral triangle.
- Students can select both the circles and use the bottom center toolbar to hide them by selecting the invisible option.
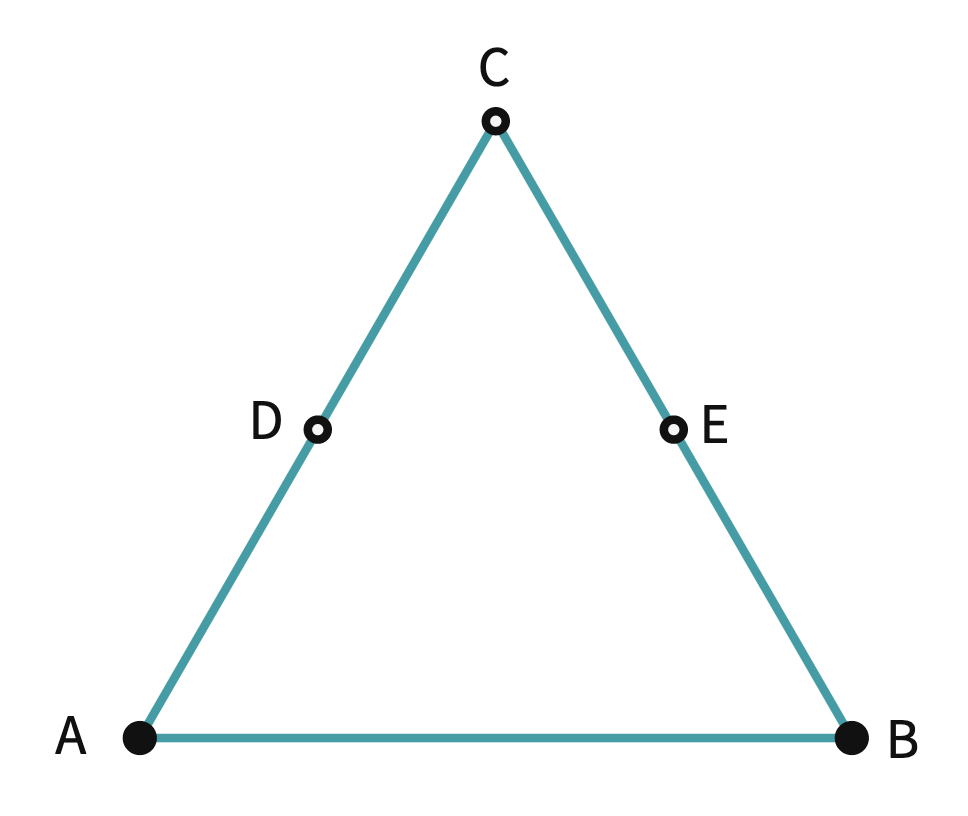
- Label the vertices of the triangle as ABC as in the given triangle. Then, select sides AC and BC and use the center toolbar to mark their midpoints as D and E, respectively.
Discuss as a class if a shortcut can be used to divide side c into four congruent pieces.
One approach can be dividing the side into halves two times to locate the points H and G.
- Select side AB and use the center toolbar to mark its midpoint. Then hide the side c by using the invisible option. Next, create two halves using the segment tool. Select each half to mark the midpoints again. (If you hold down shift and select any two points like point A and the midpoint of AB, you have the option to construct their midpoint without drawing a line between them) At the final step, you can hide the initial midpoint of side c since we only need points H and G.
- Connect points E and H with the segment tool. This segment will form the first cut of the triangle.
Ask students about the next steps to locate the final points, M and N. You may want to remind them that both DM and GN are perpendicular to HE.
- Select the segment HE, and use the bottom toolbar to construct perpendicular lines passing through D and G. hide the perpendicular lines after marking the intersection points.
Students have now located all the necessary points to form the pieces of the triangle. They can now use the custom polygon tool to create all four pieces. Finally, let them reassemble the pieces as a square to check their construction.
Closure
Share some student work with the class. To close the lesson, ask students to calculate the areas and perimeters of both the square and the triangle. If the students already knew about the formula of , they can use it to find the area of the triangle directly. You may also want to ask about the ratio between the side length of the triangle and the square if they have the same area.
Polypads for This Lesson
To assign these to your classes in Mathigon, save a copy to your Mathigon account. Click here to learn how to share Polypads with students and how to view their work.